When I launched this blog a couple years back, I wanted to add a bit of flair to the newsletter subscribe button. My idea: an animated rainbow gradient for the background.
I love gradients. After so many years of solid colors and flat design, I'm glad to see them making a comeback!
It turned out that animating CSS gradients was a lot more trouble than I expected, and the result was a little underwhelming:
Rather than animating the gradient directly, I created a very tall gradient, and translated it up within the button, resetting it once it neared the bottom. My trusty friend overflow: hidden made sure that the excess wasn't visible to the user.
This approach kinda works, but there are problems:
- The looping isn't entirely seamless. Subtle differences in performance across devices means that it can be noticeable when the position resets.
- It just doesn't look that great; I wanted something with an organic kind of flowing quality, and this just felt static and lifeless.
Over the past couple years, I've given this button a lot of thought. It's been a long time coming, but after discovering a wild new technique, I was finally able to come up with something I like.
Without further ado, the new button:
Link to this headingRadial gradients to the rescue!
This new model uses a radial-gradient: color seeps out from the top-left corner, shifting slowly through the rainbow, cascading across the button's surface.
More precisely, there's a 3-color radial gradient anchored in the top-left corner. The colors would all be adjacent in the rainbow, and each "tick" of the animation would shift the colors down:


The big difference here is that nothing is actually moving. There's no translate happening on a 2D plane anymore. Instead, I'm sampling 3 colors from a 10-color rainbow palette, and each point in the gradient is slowly shifting to inherit the color in the previous point. The C3 point is always 1 color behind in the palette from the C2 point.
This creates the illusion of motion, similar to those casino or venue lights:
Link to this headingAnimating gradients
So the game plan was coming together:
- I'd create a palette of 10 rainbow colors.
- I'd set a gradient to hold a moving window of 3 colors.
- I'd run an interval that would update the gradient every second, shifting each color by 1 spot.
- I'd tween between the colors in each spot. On every frame, the colors should inch towards their next value.
That last step was the trickiest. Unfortunately, you can't use transition to interpolate between background gradients. The following snippet doesn't work:
.gradient {
background: radial-gradient(...);
/* 🙅♀️ Doesn't work */
transition: background 1000ms;
}I could do it all in JS. I could set up a requestAnimationFrame loop that splits each color transition into ~60 incremental steps. I didn't like this idea, it felt overengineered. Plus, because it would all be happening on the main thread in JavaScript, the animation could become choppy during busy periods.
I wanted to do the interpolating in CSS. And happily, I found a way 😊
Link to this headingCustom properties (AKA CSS variables)
For a while now, CSS has had variables. At first blush, they look a lot like the variables you'd see in SASS or LESS, but unlike preprocessors, variables are still in the code at runtime. This makes them much more powerful, as we'll soon see!
Here's how you can use CSS custom properties in a gradient:
.gradient {
  /*
    Variables are defined right along style declarations.
    They're indicated by the double-hyphen prefix.
  */
  --color-1: deepskyblue;
  --color-2: navy;

  /*
    You can access variables using the 'var()' function:
  */
  background: linear-gradient(170deg, var(--color-1), var(--color-2));
}
In a React context, we can set CSS variables on the React element in question using inline styles:
<div
  style={{
    '--color-1': 'deepskyblue',
    '--color-2': 'navy',
    background: `
      linear-gradient(
        170deg,
        var(--color-1),
        var(--color-2) 80%
      )
    `,

    // Unrelated styles:
    color: 'white',
    textAlign: 'center',
    padding: 30,
    borderRadius: 12,
  }}
>
  Hello World
</div>
On their own, this doesn't actually help us. We still can't apply transition directly on background. But it gets us one step closer. 🕵🏻♂️
Link to this heading🎩 CSS Houdini
CSS Houdini is a wide-ranging set of upcoming CSS enhancements predicated on one idea: developers should be able to create their own CSS features.
For example, CSS doesn't have any built-in way to do masonry layouts. Wouldn't it be cool if you could build it, plugging in directly to CSS mechanisms, and then access it with display: masonry?
For another example: projects like Babel allow us to "polyfill" (most) missing features in JS, because we can mimic those new features using an earlier version of the language. But we can't polyfill (most) CSS features. Houdini will allow us to polyfill in missing CSS, by giving us access to the internal wiring of the CSS engine.
CSS Houdini is a huge project, already years into research and development, and I expect it'll shape the future of web development in exciting and unpredictable ways. For today, though, I'd like to focus on one relatively small but incredibly cool part of this: animated custom properties.
Link to this headingAnimated custom properties
In CSS, a "property" is something you can assign a value. display and transform and color are all examples of properties. Why, then, are variables in CSS called custom properties? Aren't they a totally different concept?
Actually, they're more similar than I realized. It's better to think of CSS variables as your own properties, like display and transform.
.gradient {
  /* Create a new custom property, and give it a value: */
  --color: navy;

  /* Access that value using the `var` function: */
  background-color: var(--color);
  border: 2px dashed var(--color);
}
Here's the wild, mind-blowing part: you can apply transitions to custom properties:
.gradient {
  --magic-rainbow-color-0: hsl(0deg, 96%, 55%);
  --magic-rainbow-color-1: hsl(25deg, 100%, 50%);
  --magic-rainbow-color-2: hsl(40deg, 100%, 50%);

  background: linear-gradient(
    170deg,
    var(--magic-rainbow-color-0),
    var(--magic-rainbow-color-1),
    var(--magic-rainbow-color-2)
  );

  /* 🤯 */
  transition:
    --magic-rainbow-color-0 1000ms linear,
    --magic-rainbow-color-1 1000ms linear,
    --magic-rainbow-color-2 1000ms linear;
}
We're not telling the browser to animate the background property, we're telling the browser to animate our custom property. And then we're using that custom property in our background gradient. Amazingly, the var() keyword is reactive, causing the background to re-paint whenever the value changes, even when that value is being tweened by transition.
My mind is still buzzing with the possibilities. CSS custom properties are so much cooler than I realized, and Houdini gives us downright magical powers ✨🧙✨
Link to this headingOne more piece: registering the property
There's one more thing we need to do before this will actually work. We need to tell the browser what the type of our custom property is.
Should the browser treat it as a color? A length? An angle? We need to be explicit about it, so that the browser knows how to interpolate changes.
We do this in JS with the following method:
CSS.registerProperty({
  // The name of our property, should match what we use in our CSS:
  name: '--color-1',

  // How we want to interpolate that value, when it changes:
  syntax: '<color>',

  // Whether it should inherit its value from its ancestors
  // (like `font-size` does) or not (like `position` doesn't)
  inherits: false,

  initialValue: 'hsl(0deg, 96%, 55%)',
});
Link to this headingA vanilla JS demo
In a bit, we'll see how React hooks let us package this up rather nicely. First, though, I wanted to share the raw JS code, for folks using a different framework, or no framework at all:
const rainbowColors = [
  'hsl(1deg, 100%, 55%)', // red
  'hsl(25deg, 100%, 50%)', // orange
  'hsl(40deg, 100%, 50%)', // yellow
  'hsl(130deg, 100%, 40%)', // green
  'hsl(230deg, 100%, 45%)', // blue
  'hsl(240deg, 100%, 45%)', // indigo
  'hsl(260deg, 100%, 55%)', // violet
];
const paletteSize = rainbowColors.length;

// Number of milliseconds for each update
const intervalDelay = 1000;

const colorNames = [
  '--magic-rainbow-color-0',
  '--magic-rainbow-color-1',
  '--magic-rainbow-color-2',
];

// Register properties
colorNames.forEach((name, index) => {
  CSS.registerProperty({
    name,
    syntax: '<color>',
    inherits: false,
    initialValue: rainbowColors[index],
  });
});

const buttonElem = document.querySelector('#rainbow-button');

let cycleIndex = 0;

window.setInterval(() => {
  // Shift every color up by one position.
  //
  // `% paletteSize` is a handy trick to ensure
  // that values "wrap around"; if we've exceeded
  // the number of items in the array, it loops
  // back to 0.
  const nextColors = [
    rainbowColors[(cycleIndex + 1) % paletteSize],
    rainbowColors[(cycleIndex + 2) % paletteSize],
    rainbowColors[(cycleIndex + 3) % paletteSize],
  ];

  // Apply these new colors, update the DOM.
  colorNames.forEach((name, index) => {
    buttonElem.style.setProperty(name, nextColors[index]);
  });

  // increment the cycle count, so that we advance
  // the colors in the next loop.
  cycleIndex++;
}, intervalDelay);
Link to this headingHook it up ⚛️
One of the neat things about React hooks is that they give the developer more control around how different ideas are expressed. Custom hooks let us shove a bunch of stuff in a box, and it's up to us to draw the boxes. We can choose whether we want to optimize for reusability, or clarity, or anything else.
In this case, I'd like to keep things friendly. I'm OK sacrificing a bit of power or flexibility in exchange for a no-fuss no-frills useRainbow hook.
Link to this headingState and API
Initially, I was thinking I would hold the current colors in state, but it occurred to me that the colors are derived data; the real bit of state is the current interval count.
If I'm on the 5th cycle, for example, I know that my colors will be the 5th, 6th, and 7th colors in my 10-color palette. Because the palette is static, I can just track that number, and use it to derive the colors.
The next thing I wanted to figure out was the hook's interface. I started by writing the component that will consume this hook. I like just making up whatever API seems ideal for the component that uses it. Consumer-driven development.
import useRainbow from './useRainbow.hook';

const MagicRainbowButton = ({ children, intervalDelay = 1000 }) => {
  // The hook should take 1 argument, `intervalDelay`.
  // it should return an object in this shape:
  /*
    {
      '--magic-rainbow-color-0': hsl(...),
      '--magic-rainbow-color-1': hsl(...),
      '--magic-rainbow-color-2': hsl(...),
    }
  */
  const colors = useRainbow({ intervalDelay });

  const colorKeys = Object.keys(colors);

  return (
    <ButtonElem
      style={{
        // Spread the colors to define them as custom properties
        // on this element
        ...colors,

        // Use the keys to set the same transition on all props.
        transition: `
          ${colorKeys[0]} ${transitionDelay}ms linear,
          ${colorKeys[1]} ${transitionDelay}ms linear,
          ${colorKeys[2]} ${transitionDelay}ms linear
        `,

        // Use those property values in our gradient.
        // Values go from 2 to 0 so that colors radiate
        // outwards from the top-left circle, not inwards.
        background: `
          radial-gradient(
            circle at top left,
            var(${colorKeys[2]}),
            var(${colorKeys[1]}),
            var(${colorKeys[0]})
          )
        `,
      }}
    >
      {children}
    </ButtonElem>
  );
};
With that in mind, here's the initial version of this hook:
const rainbowColors = [
  /* colors here */
];
const paletteSize = rainbowColors.length;

const useRainbow = ({ intervalDelay = 2000 }) => {
  // On mount, register all of our custom properties
  React.useEffect(() => {
    for (let i = 0; i < 3; i++) {
      try {
        CSS.registerProperty({
          name: `--magic-rainbow-color-${i}`,
          initialValue: rainbowColors[i],
          syntax: '<color>',
          inherits: false,
        });
      } catch (err) {
        console.log(err);
      }
    }
  }, []);

  // Get an ever-incrementing number from another custom hook*
  const intervalCount = useIncrementingNumber(intervalDelay);

  // Using that interval count, derive each current color value
  return {
    '--magic-rainbow-color-0': rainbowColors[(intervalCount + 1) % paletteSize],
    '--magic-rainbow-color-1': rainbowColors[(intervalCount + 2) % paletteSize],
    '--magic-rainbow-color-2': rainbowColors[(intervalCount + 3) % paletteSize],
  };
};

export default useRainbow;
useIncrementingNumber is a custom hook that spits out a new, ever-increasing number, based on a provided interval delay. It's based off of Dan Abramov's setInterval hook(opens in new tab). You can view its source here(opens in new tab).
I like this approach, because there's a clear separation of duties:
useRainbowis in charge of generating and managing the colors, but has no vote in what they're used for.- The component,
MagicRainbowButton, doesn't know anything about where these colors came from or when they update, but decides what to do with them.
There's one thing that makes my spidey-sense tingle a bit; it's pretty surprising that useRainbow secretly registers global CSS custom properties. In fact, registering a global value from within an instanced component is going to be problematic! We'll tackle this, and some other lingering issues, in the next section.
Link to this headingMaking this production-ready
Before you start shipping rainbow buttons all over your law firm's website or your accounting software, there are a couple things we need to think about.
Link to this headingGlobal properties and duplicate components
The biggest problem with our current implementation is that it violates a core React principle: every instance of a component should be independent. We should be able to render as many copies of it as we want, without them interfering with each other.
If we try to render two copies of our MagicRainbowButton on the same page, we get this error:
InvalidModificationError: Failed to execute 'registerProperty' on 'CSS': The name provided has already been registered.
This is because the CSS custom properties registry is a global object; all of our component instances are sharing the same global namespace! And right now, they're both trying to register the same names.
We can get around this by generating a unique ID for each component instance using the useId hook(opens in new tab):
const useRainbow = ({ windowSize = 3, intervalDelay = 2000 }) => {
  const uniqueId = React.useId();

  React.useEffect(() => {
    for (let i = 0; i < 3; i++) {
      try {
        CSS.registerProperty({
          name: `--magic-rainbow-color-${uniqueId}-${index}`,
          initialValue: rainbowColors[i],
          syntax: '<color>',
          inherits: false,
        });
      } catch (err) {
        console.log(err);
      }
    }
  }, []);

  // The rest omitted. ✂️
};
This also makes me feel better about the "secret side-effects in hooks" thing. A bit of randomness rules out the risk of name collisions, letting us pretend that it isn't actually global.
Link to this headingBrowser support
It’s taken a while, but CSS.registerProperty is now available in all major browsers(opens in new tab).
Even still, it’s a good idea to support users on older browsers. My preferred solution is to bail out of the hook early if the window.CSS or window.CSS.registerProperty APIs aren’t implemented:
const useRainbow = ({ windowSize = 3, intervalDelay = 2000 }) => {
  const uniqueId = React.useId();

  React.useEffect(() => {
    if (!window.CSS || !window.CSS.registerProperty) {
      return;
    }

    // The rest omitted. ✂️
  }, []);
};
This means that users on older browsers won’t see the animation, but they’ll still see the static gradient! For most use cases, I think this should be sufficient.
Link to this headingPerformance
Last year, I gave a talk(opens in new tab) about animation/interaction performance. In that talk, I mention that there are two "gold standard" properties: opacity and transform. Those two properties perform way better than other properties, because they don't have to paint on every frame, they can be manipulated directly by the graphics card as a texture, shimmying around without the CPU doing any work.
In that talk, I also advocated for breaking this rule, as long as you're measuring. With a 6x throttle on my CPU, I fired up the profiler:
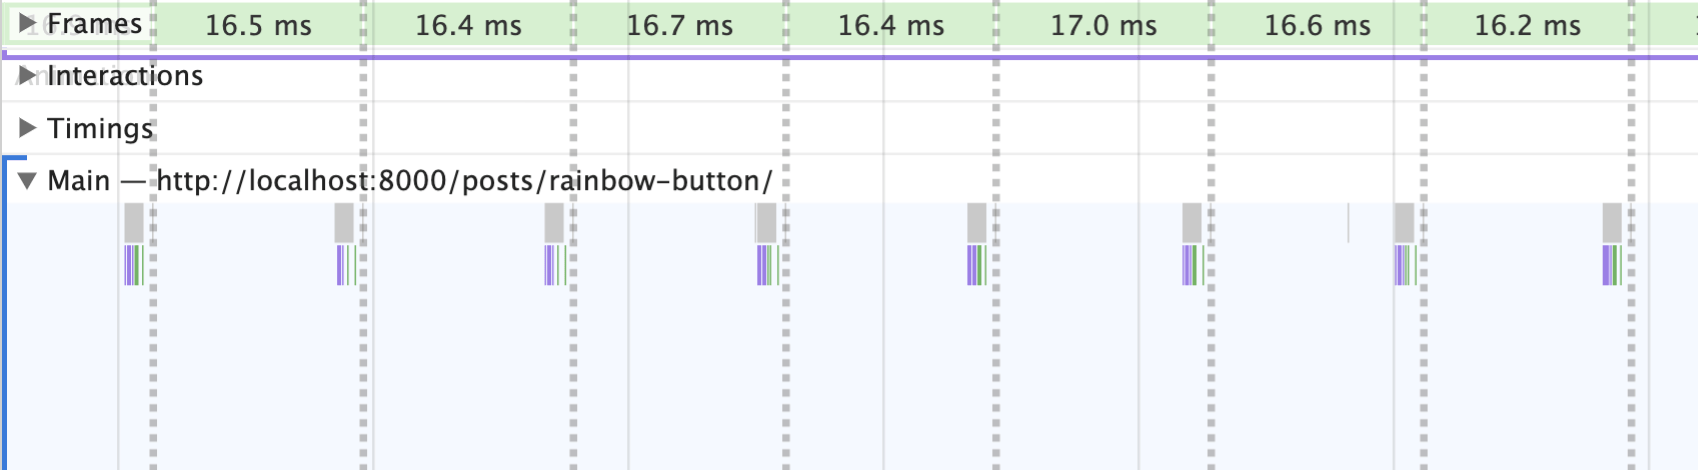
It is true that this technique involves a repaint on every frame, and that repaints can be slow… but in this case, the amount of repainting is tiny. The repaint takes ~0.3 milliseconds, which is about 2% of our budget if we want to hit 60fps.
Animating properties like height is often very slow, because it involves both a layout and paint step, and because the number of pixels involved can be very large. In this case, there's no layout step, and the paint step is quick and targeted 💫
Link to this headingAccessibility
Whimsical touches are great, but not when they come at the expense of usability.
Certain types of animations can be problematic for folks with vestibular disorders—they can trigger vertigo, nausea, headaches, and other nasty symptoms.
Browsers have been hard at work implementing support for a "prefers-reduced-motion"(opens in new tab) media query. This query relies on a Windows/macOS setting, and lets users express that they would like to disable animations.
Here's how we can use it here:
.gradient {
  /* Fallback background, for folks who wish to reduce motion */
  background: linear-gradient(
    170deg,
    hsl(0deg, 96%, 55%),
    hsl(25deg, 100%, 50%)
  );
}

@media (prefers-reduced-motion: no-preference) {
  .gradient {
    --magic-rainbow-color-0: hsl(0deg, 96%, 55%);
    --magic-rainbow-color-1: hsl(25deg, 100%, 50%);
    --magic-rainbow-color-2: hsl(40deg, 100%, 50%);

    background: linear-gradient(
      170deg,
      var(--magic-rainbow-color-0),
      var(--magic-rainbow-color-1),
      var(--magic-rainbow-color-2)
    );

    transition:
      --magic-rainbow-color-0 1000ms linear,
      --magic-rainbow-color-1 1000ms linear,
      --magic-rainbow-color-2 1000ms linear;
  }
}
First, we set a static gradient as the default. Then, if the user hasn't requested reduced motion, we apply our fancy dynamic version.
This method might seem backwards; wouldn't it make more sense to have the animated gradient be the default value, and then strip it out if prefers-reduced-motion is set to reduce?
Well, let's consider what happens if the user is using an older browser, one which doesn't support the “prefers-reduced-motion” media query. For that user, everything inside the media query will be ignored. By structuring it so that the static version is the default, we ensure that users who can't express a preference receive the static version, not the animated one.
This is becoming less and less of a concern, since “prefers-reduced-motion” has been supported in all major browsers for several years, but I still prefer to err on the side of safety.
In addition to motion, we also need to think about color contrast. Will folks with vision impairments be able to read the text in the button? I added a bit of text shadow, and darkened the warm end of the spectrum. Truthfully, it may still be too low-contrast for certain periods in the animation, but I'm confident it's legible most of the time, and the animation shifts quickly.
Link to this headingConclusion
If you're keen to build your own rainbow button, the source code for this one might come in handy. The current version of my blog is closed-source, but you can see the full source for this button on an earlier version of my blog(opens in new tab).
If you do wind up using this effect somewhere, I'd love to see it! Let me know what you do with it!
Link to this headingOne more subscribe button
It's a brand new year, and one of my goals for 2020 is to produce many high-quality interactive blog posts like this one. My newsletter is the best way to find out when something new is posted.
I know I've thrown a lot of "subscribe" buttons at you this post, but this last one is for real. Won't you join my newsletter?
Last updated on
December 19th, 2024